만들어보는 redux 예제
벨로퍼트님의 counter , todo 예제를 보고 조금만 수정해서 만들어보자.
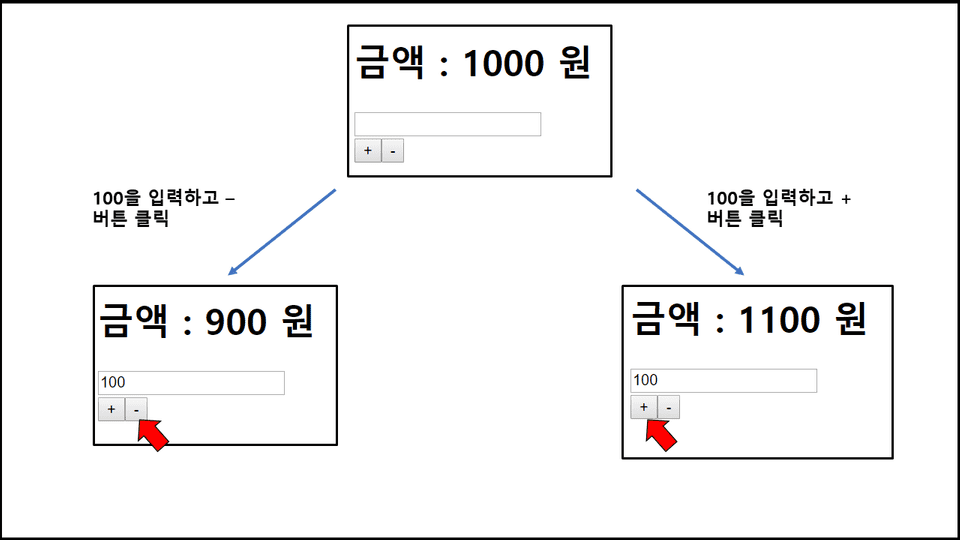
만들고 싶은 것은 숫자를 입력하고 버튼을 누르면 기존 값과 입력한 숫자 값이 합쳐져서 표시 되는 것이다.

    파일위치 : src/components/Test.js
    import React from "react";

    const Test = ({ input, number, onplus, onminus, onchange }) => {
    const onChange = e => onchange(e.target.value);
    return (
    <div>
    <h1>금액 : {number} 원</h1>
    <form>
            <input value={input} onChange={onChange} />
    </form>
    <div>
            <button onClick={onplus}>+</button>
            <button onClick={onminus}>-</button>
    </div>
    </div>
    );
    };

    export default Test;
먼저 presentational components 를 만든다. 이 컴포넌트는 껍데기다. 그냥 보여줄 수 있는 틀을 잡아 놓은 것이다.
이제부터 module폴더 안에 액션 타입, 액션 함수, 리듀서를 만들 것이다.
- input 에 변화를 일으키는 change
- plus 버튼을 누를 때 더해줄 함수
- minus 버튼을 누를 때 값을 빼줄 함수
위 3가지 함수가 필요하다. 이제 아래와 같이 작성을 한다.
    파일위치 : src/module/test.js

    const CHANGE = "test/CHANGE";
    const PLUS = "test/PLUS";
    const MINUS = "test/minus";

    export const change = input => ({
    type: CHANGE,
    input
    });
    export const plus = input => ({
    type: PLUS,
    input
    });

    export const minus = input => ({
    type: MINUS,
    input
    });

    const initialState = {
    input: "",
    number: 1000
    };

    function test(state = initialState, action) {
    switch (action.type) {
    case CHANGE:
    return {
            ...state,
            input: action.input
    };
    case PLUS:
    return {
            ...state,
            number: state.number + state.input * 1
            //* 1 을 해주지 않으면 숫자가 옆으로 그냥 붙기 때문.
    };
    case MINUS:
    return {
            ...state,
            number: state.number - state.input
    };
    default:
    return state;
    }
    }

    export default test;
그리고 만들어진 reducer 를 rootReducer에다가 하나로 뭉쳐줘야 한다. rootReducer는 module 폴더의 index.js 에 만들어 놓았다. (redux-1,2,3 참조)
    파일위치 : src/module/index.js

    import { combineReducers } from "redux";
    import counter from "./counter";
    import todos from "./todos";
    import test from "./test";

    const rootReducer = combineReducers({
    counter,
    todos,
    test
    });

    //counter.js 와 index.js 에서 만든 reducer 2개를 하나의 reducer로 합쳐준다.
    //왜냐하면 , createStore함수를 사용해서 store를 만들때는 하나의 reducer만 사용해야 하기 때문에
    //여러개의 reducer들을 하나로 합쳐줘야 한다.
    export default rootReducer;
이전에 만들어 놓았던 counter와 todos도 같이 보인다.
이제 container component 를 만들어야 한다. 이 컴포넌트의 역할은 실제 redux 의 store(state)에 있는 값을 presentational component 로 넘겨줘야 하기 때문이다.
    파일위치 : src/container/TestContainers.js

    1  import React from "react";
    2  import Test from "../components/Test";
    3  import { connect } from "react-redux";
    4  import { plus, minus, change } from "../module/test";
    5  // import { bindActionCreators } from "redux";
    6
    7  const TestContainer = ({ number, change, plus, minus, input }) => {
    8     return (
    9        <Test
    10          number={number}
    11          input={input}
    12          onchange={change}
    13          onplus={plus}
    14          onminus={minus}
    15         />
    16      );
    17    };
    18
    19  const mapStateToProps = state => ({
    20     number: state.test.number,
    21     input: state.test.input
    22    });
    23
    24  const mapDispatchToProps = dispatch => ({
    25     plus: () => {
    26     dispatch(plus());
    27  },
    28  minus: () => {
    29     dispatch(minus());
    30  },
    31  change: () => {
    32     dispatch(change());
    33  }
    34  });
    35
    36  // export default connect(mapStateToProps, mapDispatchToProps)(TestContainer);
    37
    38  // export default connect(mapStateToProps, { plus, minus, change })(TestContainer);
    39
    40  export default connect(
    41    ({ test }) => ({
    42       input: test.input,
    43       number: test.number
    44     }),
    45    { plus, minus, change }
    46    )(TestContainer);
여기서 중요한것이 있다. 19번과 24번째 줄의 mapStateToProps와 mapDispatchToProps를 작성하긴 했는데, connect함수내에서는 먹히지 않는다는것이다…
그래서 connect 함수 내에 직접 선언하는 방식으로 40번재 줄부터 작성하였더니, 정상 작동했다… 왜 그런지는 아직 모른다 … 앞으로 redux 를 사용할때는 40번째 줄처럼 작성을 해야겠다.
조심해야할 점은 presentational component 에서 container component의 값을 받아올 때 state에서 가져오는 값(우리 예제에서는 number , input) + action 함수(change, plus, minus) 총 5개 라는 것을 기억해야 한다.
처음에 예제 만들때, state에서 넘어오는 값을 주지 않아서 멍…했다
추가 사항
mapDispatchToProps 에서 되지 않았던 이유를 발견했다.
    24  const mapDispatchToProps = dispatch => ({
    25     plus: () => {
    26     dispatch(plus());
    27  },
    28  minus: () => {
    29     dispatch(minus());
    30  },
    31  change: () => {
    32     dispatch(change());
    33  }
    34  });
여기서 line31, line32 를 보자. change 함수가 ()=>{dispatch(change()) 라고만 되어 있다. 아래에 있는 change의 action 함수를 보자.
    //액션함수
    export const change = input => ({
    type: CHANGE,
    input
    });
중요한 점을 놓치고 있었는데, 바로 함수내에 input이 들어가야 한다는것 이다. 그러면 mapDispatchToProps에서 어떻게 고쳐주면 정상이 될까?
    24  const mapDispatchToProps = dispatch => ({
    25     plus: () => {
    26     dispatch(plus());
    27  },
    28  minus: () => {
    29     dispatch(minus());
    30  },
    31  change: input => {
    32     dispatch(change(input));
    33  }
    34  });
다음과 같이 change 내에 input을 넣어주게 되면, mapDispatchToProps가 정상작동 한다.
도움을 주신 위코드 프론트엔드 멘토 예리님 감사합니다. https://stackoverflow.com/c/wecode/questions/727
