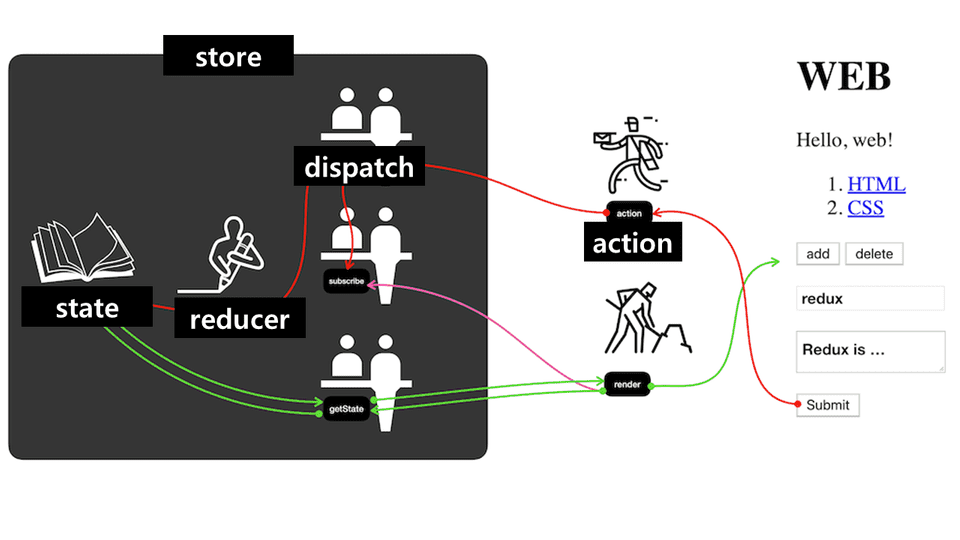
redux-3
리덕스의 큰 그림을 살펴보면 위와 같다.
우리가 해야할 것
1. 액션 타입 생성
2. 액션 생성 함수
3. 리듀서 생성
4. 리듀서 합치기 (combine)
5. react와 연결 - 스토어 생성(가장 최상위의 index.js) + Provider로 감싸기 + 크롬 개발자 연결
- react와 연결 - container component(redux와 연결된 component) 에서 연결
- react와 연결 – connect함수 ,dispatch하기
react와 연결 - container component(redux와 연결된 component) 에서 연결
먼저 container component 를 만들기 전에 presentational component 에서 무엇을 인자로 받아야 하고 뭘 보여주는지 확인해보자.
//위치 : component/counter.js           (presentational component임)

import React from "react";

const Counter = ({ number, onIncrease, onDecrease }) => {
return (
    <div>
    <h1>{number}</h1>
    <div>
        <button onClick={onIncrease}>+1</button>
        <button onClick={onDecrease}>-1</button>
    </div>
    </div>
);
};

export default Counter;
간단한 함수형 컴포넌트다. number, onIncrease, onDecrease 라는 3가지를 인자로 받고 return에서 사용된다.
이 presentational component 가 App.js 에서 다음과 같이 사용되고 있다.
//위치 : src/App.js

import React from "react";
import Counter from "./components/Counter";
const App = () => {
return (
    <div>
    <Counter />
    </div>
);
};

export default App;- 현재는 보여지기 위함으로 presentational component가 자리잡고 있지만 redux와 연결된 component(container component)가 완성되면 container component로 바꿔치기 당한다.
이제부터 container component를 진짜 만들어보자.
//위치 : src/container/CounterContainer.js

import React from 'react';
import Counter from './components/Counter';

const CounterContainer = () =>{
    return <Counter/>
};

export default CounterContainer;
이렇게 되어 있으면 과연 presentational component와 뭐가 다른것인가 … 다를게 없으니, 이제 뭘 넣어야 될지 살펴보자.
우선 우리의 목적은 module 에서 만든 redux 를 연동(connect)시키기 위함이다. 잊지말자.
넣어야 될 것 :
- connect 함수
- dispatch
dispatch안에는 뭐가 들어갈까요?바로 액션 생성함수!
이렇게 3가지가 이곳(src/container/CounterContainer.js)에서 사용될 것이다.
우선 connect 함수를 살펴보면 connect(mapStateToProps, mapDispatchToProps)(연동할컴포넌트) 이렇게 생겼다.
이해가 잘 되진 않으나 하나씩 뜯어보면
mapStateToProps: 스토어 안의 상태(state)를 컴포넌트의 props로 넘겨주기 위해 사용되는 함수mapDispatchToProps: 액션 생성 함수(module에서 만든거)를 컴포넌트의 props로 넘겨주기 위해 사용되는 함수(연동할컴포넌트): connect 함수에 위 2가지 인자가 들어갔다가 나오게 되면 다시 함수를 반환한다고 한다. 그 함수에(연동할컴포넌트)를 넣어주게 되면 리덕스와 연동된 컴포넌트 드디어 생성된다!!!!
라고 설명할수있다. 이제 재료 준비는 다됐고, 조립만 하면 된다는 얘기다.
// 위치 : src/container/CounterContainer.js

import React from 'react';
import {connect} from 'react-redux';
import Counter from '../components/Counter';
import {increase, decrease} from '../module/counter'

const CounterContainer = ({number, increase, decrease})=>{
    return(
        <Counter number={number} onIncrease={increase} onDecrease={decrease} />
    );
};

const mapStateToProps = state =>({
    number:state.counter.number
});

const mapDispatchToProps = dispatch =>({
    increase:()=>{
        dispatch(increase());
    },
    decrease:()=>{
        dispatch(decrease());
    }
});

export default connect(
    mapStateToProps,
    mapDispatchToProps
)(CounterContainer)
이렇게 작성하면 된다고 하나, 무슨말인지 설명이 없으면 힘드니 해석을 시작해보자.
1.컴포넌트의 내용을 담고있는 첫번째 함수이다.
const CounterContainer = ({number, increase, decrease})=>{
        return(
            <Counter number={number} onIncrease={increase} onDecrease={decrease} />
        );
    };
위에 사용된 <Counter/> 컴포넌트에도 인자가 3개 있었다. 마찬가지로 여기도 3개의 인자(number, onIncrease, onDecrease)를 넣어줘야 해서 (number, increase, decrease)를 넣어준다.
2.mapStateToProps 함수 설명
const mapStateToProps = state =>({
        number:state.counter.number
    });
이 함수에는 state가 파라미터로 들어가며, 현재 스토어가 지니고 있는 내용을 number 라는 이름으로 props로 주겠다 라는 뜻이다.
state: {
    counter:{
        number:1
    }
}
state의 상태는 위와 같을 것이다.
3.mapDispatchToProps 함수 설명
const mapDispatchToProps = dispatch =>({
        increase:()=>{
            dispatch(increase());
        },
        decrease:()=>{
            dispatch(decrease());
        }
});<Counter/>에 주고 있는것이 number, increase, decrease 였던 것을 기억하죠? 이 중 increase, decrease는 액션 생성 함수입니다. dispatch 와 연동된 액션 생성 함수를 props로 넘겨주기 위해 사용된다.
4.export default connect
export default connect(
        mapStateToProps,
        mapDispatchToProps
    )(CounterContainer)
위에서 함수들을 선언하는게 끝났으면 이제 connect 함수를 사용해 마무리 지어야 된다.
(CounterContainer)를 맨마지막에 붙여 연동할 컴포넌트 즉, 현재 내보낼 component 이름을 넣어주면 마무리 된다.
연결 끝?
아니다. 지금 한 작업은 container component 를 만들기만 했다. 이제 App.js 에서 presentational component로 보여지기만 했던 <Counter/> 를 <CounterContainer/>로 바꿔줘야 한다.
//위치 : src/App.js

import React from "react";
import CounterContainer from "./container/CounterContainer";
const App = () => {
return (
    <div>
    <CounterContainer />
    </div>
);
};

export default App;
이렇게 바꿔주게 되면 정말 연결이 끝났다.
끝!
인줄알았으나, connect 함수를 사용하는 과정이 너무 코드들이 많아서 지저분해보이지 않았나요
깔끔하게 바꿀 수 있는 방법이 있습니다.
첫번째 방법
바로 export default connect()(CounterContainer) 에서 직접 선언하는 것입니다.
import React from 'react';
import {connect} from 'react-redux';
import Counter from '../components/Counter';
import {increase, decrease} from '../module/counter'

const CounterContainer = ({number, increase, decrease})=>{
    return(
        <Counter number={number} onIncrease={increase} onDecrease={decrease} />
    );
};

export default connect(
    state=>({
        number:state.counter.number
    }),
    dispatch=>({
        increase: () => dispatch(increase());
        decrease: () => dispatch(decrease());
    })
)(CounterContainer)
로 바꾸면 깔끔하게 할 수 있다고 합니다.
두번째 방법
bindActionCreators 함수 사용
어렵지 않을겁니다 … 아마도 … 리덕스 개발자도 이 함수를 만들게 된 이유도 불필요한 걸 줄이고 쉽게 사용하기 위함일테니까 …
import React from 'react';
import {connect} from 'react-redux';
import Counter from '../components/Counter';
import {increase, decrease} from '../module/counter'
import {bindActionCreators} from 'redux';

const CounterContainer = ({number, increase, decrease})=>{
    return(
        <Counter number={number} onIncrease={increase} onDecrease={decrease} />
    );
};

export default connect(
    state => ({
        number:state.counter.number
    }),
    dispatch =>
      bindActionCreators({
          increase,
          decrease
      },
      dispatch
      )
)(CounterContainer);bindActionCreators만 사용했는데, 위에서 선언한 이해하기 어려운 함수들을 안써도 되네요???
여기까지만 자유자재로 사용만 해도,
Redux를 사용하는데 어려움이 없을 것 같습니다.
이제 배운걸 응용해보면서 익숙해지도록 합시다
class 에서 redux를 사용하는 법
connect함수를 유심히 들여다봐라. 그리고 뜻을 파해쳐 보면, mapStateToProps 그리고 mapDispatchToProps …
- store에 있는 state와 dispatch(액션함수)를 Props로 주겠다는 뜻이고, connect 함수 뒤에는
(해당컴포넌트)가 있다.
즉, Props로 해당컴포넌트에 넘겨주니 render() 밑에 console.log(this.props)를 찍어보면 어떻게 사용할지 감이 올 것이다.
onClick={this.props.액션함수} 라고 해도 된다.
가장 중요한 것은 connect 함수를 통해서 store의 state와 action 함수들을 this.props로 넘겨주겠다는 것 이다.
